
AN APPROACH TO AUTOMOTIVE PHOTOGRAPHY
Number four in my series of RANDY’S PHOTO TIPS a.k.a. his creative photographic process:
When approaching automotive photography, one of the first challenges is the belief that you can fix everything in post-processing. Unfortunately (or fortunately), a car’s complex bodywork and glossy paint reflects everything, especially on dark colored vehicles. So, unless your location and background are clean and well thought out beforehand, you could be left with an image that needs a lot of complicated retouching.
If you have the budget, and don’t need to shoot action or a specific location, you could always rent an automotive studio with a black or white background and a huge soft box full of lights and make distracting reflections and elements a thing of the past. But since these spaces are expensive and not always accessible, we will assume that an outdoor location will be used.
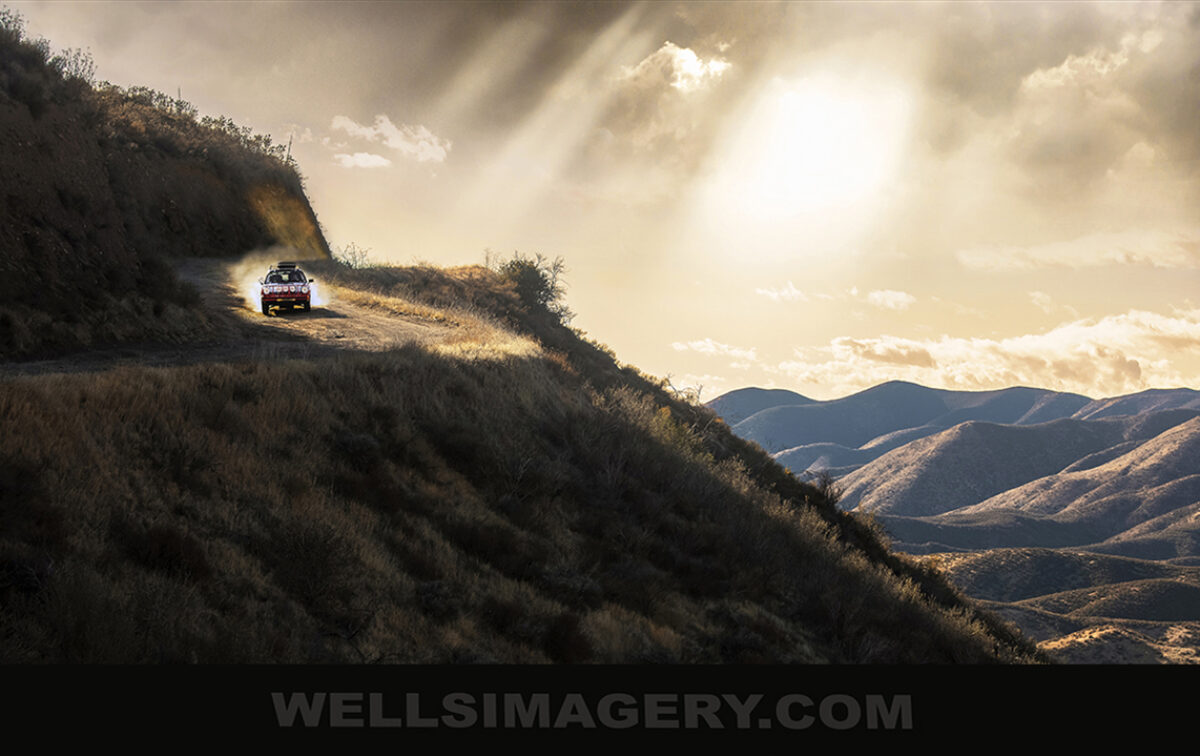
Shooting cars on location brings with it the potential of magical moments and unexpected obstacles. You could experience stormy skies, dramatic lighting, and an extra element that elevates the photograph to one that exceeds your expectations. The unpredictability of location work also means that good preparation, planning, and anticipation will put the odds in your favor. Having a portable lighting kit and scouting several alternative locations is recommended.
Special consideration should be given to the photo concept and any subsequent usage. A feeling of drama, power, speed, grace, or beauty can be accentuated with post-processing software, but it pays to capture as much of this ambience as possible beforehand. Careful pre-visualization of the appropriate setting, lighting, and perspective will allow for the best results. An elevated view, a tilted camera angle, and shooting “from the ground†can all provide for dramatic results.
Fog can lend a dreamy atmosphere. Nighttime lighting from industrial buildings, parking areas, and freeway tunnels or overpasses can produce an otherworldly appearance. Focusing on car details, implementing selective focus, or using framing elements to allow for story-telling vignettes are all good ideas, especially when aided by strong composition and design.
Each make and model of car has its own look, personality, and purpose. How aggressive or menacing does the vehicle appear? Is it more of an elegant, softly sculpted classic design? Perhaps its character is humorously vintage? Choosing a backdrop that either compliments the look of the car or contrasts sharply with it can be an advantage. For example, racecars are usually best shot at the track or in a rally type setting. Or you could try placing them against a backdrop that is startlingly unpredictable.
Using existing natural light without flash means that choosing the appropriate time of day is important. Medium/Light colored cars, especially those in metallic paint, need some directional light to give them sparkle and definition. White and dark colored automobiles look more interesting in softer light. A cloudy day will allow you to shoot for a longer time period and provide a uniform treatment when shooting a collection of cars individually.
Having a flash unit ready to go gives you more options. If time is limited and the weather suddenly turns cloudy or dark, or if the chosen background proves to be too cluttered, auxiliary lighting can separate a car from its surroundings. When it comes to photographing interiors, trunks, and engine compartments, either fill-flash, open shade, diffuse lighting, or low-angled sunset light usually excels.
Action photography of sports sedans, SUVs and exotics allows several options. You could simply park the car on a deserted road and create all the desired effects “at speed†in Photoshop. Or you could use panned action photography from the side of the road. You could also shoot car-to-car. Or you can get really complicated and attach a camera to the car with a window mount, body mount or under-body automotive rig. Or rent a helicopter…
Shutter speed selection will determine how much blur is needed in action photography. Try using everything from 1/500 to 1/4 of a second initially to see what works best. By monitoring your progress and image sharpness in the camera’s review monitor, you can be guaranteed of good results. Always ensure that you have authorized access and enlist all safety requirements when shooting from a vehicle, using a closed track, or driving on any public road.
What makes any photograph memorable is nuance combined with colors, shapes, and lines that strike a universal chord in the viewer. The photographer who has a deep connection with his or her subject is more likely to be ready to fire the shutter when a special moment appears in the viewfinder (and apply sympathetic post-processing). Just remember to have fun and keep experimenting. The challenge is to make every car photographed look unique. That way your portfolio will be diverse, compelling, and ultimately profitable. And then there’s video…
For those who can read Portuguese, here’s a recent on-line article about me:
Randy Wells Automotive Photographer

(Top photo of Randy on location by Terry English)
(Bottom photo of Randy on location by Steven Colson)